之前一篇说到,在闲置的RaspberryPi上折腾了PiAware,到现在已经运行了快三周了。之前提到说原配的天线信号不好,可能要再折腾个更强大的。这不,上周末,我又折腾了一把,不过不是买了新的天线,而是将整套设备从客厅挪到了阳台上,虽然仅仅隔了一扇玻璃门,但是接收到的信号却强了不少,每天追踪到的飞机,几乎增加了20-30%。
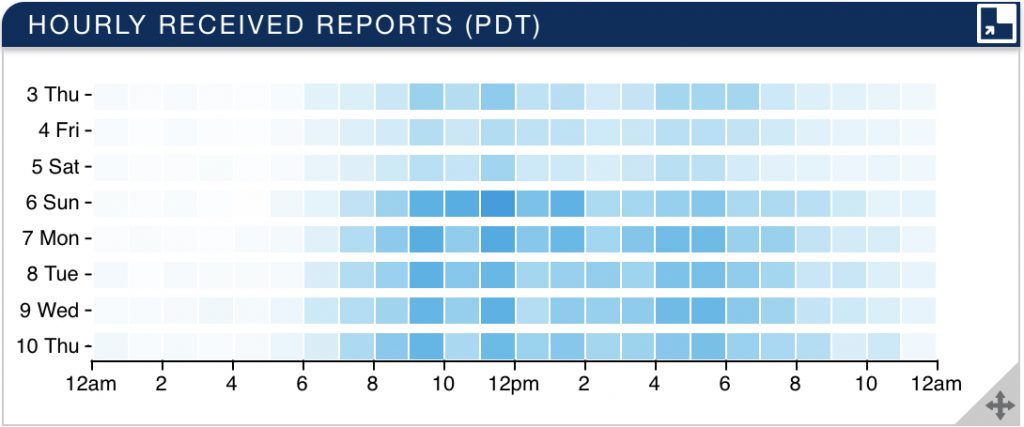
上图中,前三天是室内,后五天是转移到阳台上以后的数据,可以明显得看到蓝色加深了不少(颜色越深,则代表接收到的信号越多)。
之前一篇说到,在闲置的RaspberryPi上折腾了PiAware,到现在已经运行了快三周了。之前提到说原配的天线信号不好,可能要再折腾个更强大的。这不,上周末,我又折腾了一把,不过不是买了新的天线,而是将整套设备从客厅挪到了阳台上,虽然仅仅隔了一扇玻璃门,但是接收到的信号却强了不少,每天追踪到的飞机,几乎增加了20-30%。
上图中,前三天是室内,后五天是转移到阳台上以后的数据,可以明显得看到蓝色加深了不少(颜色越深,则代表接收到的信号越多)。
前阵子,趁迁移blog的机会,把计划了很久的相册给建了起来。最早用的是Flickr的免费相册,无限容量,而且画质优化也特别棒,可是几年前,免费用户的容量被限制到了1000张照片,远低于我希望管理的照片数,所以就慢慢地放弃了Flickr。之前也试用过其他一些免费云端相册,总有这样那样的限制,还用了一阵子QNAP自带的Photo Station,始终没法习惯他的管理模式,所以也放弃了。
这次试用了一下selfhost的Piwigo相册,出人意料的满意。Selfhost意味着可以为所欲为,不用为容量或者照片数量担心,于是便慢慢的将自己过去几年拍的一些照片,传到了Piwigo里。经过一个月左右的摸索,感觉已经达到了一个比较理想的状态了。

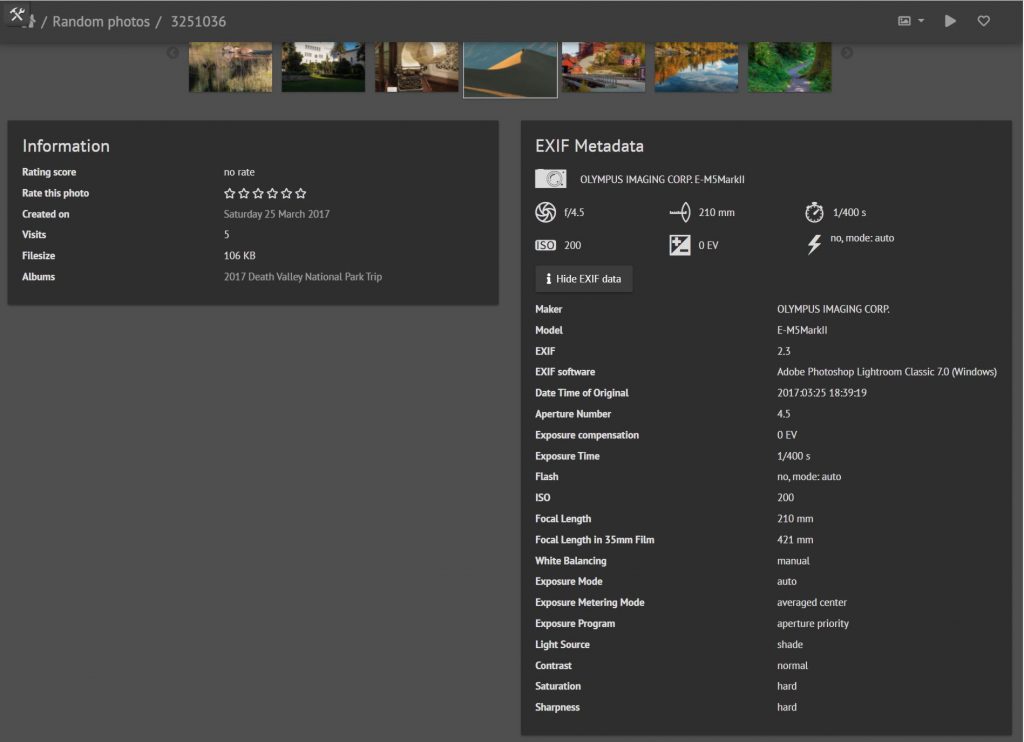
Piwigo的相簿管理非常简单,而且支持子相簿,相簿的封面照片可以自选。同时,每张照片都能看到拍摄时的exif信息,并且支持添加GPS坐标(如果拍摄时自动添加了坐标,则无需手动添加),并显示在地图插件上。
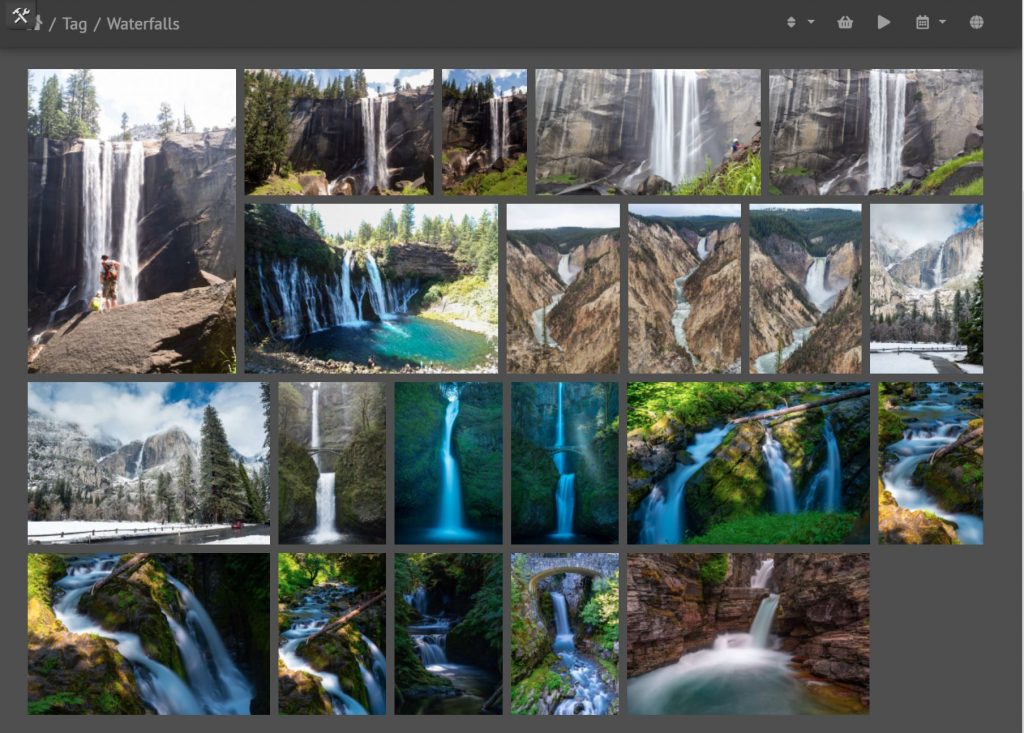
另一个比较有意思的功能是Piwigo支持标签功能,每张照片可以添加多个标签,便于管理。比如我,就创建了彩虹、瀑布、极光、野生动物、湖面倒影的几个标签,方便检索同一类型的照片。
不过,我平时管理的照片,基本都是用相机拍摄的,然而每次出游,Mei都会用自己的手机拍不少照片,其中也不乏一些蛮有意思的作品,我现在还没想好该用什么样的一种方式去管理这些相片。
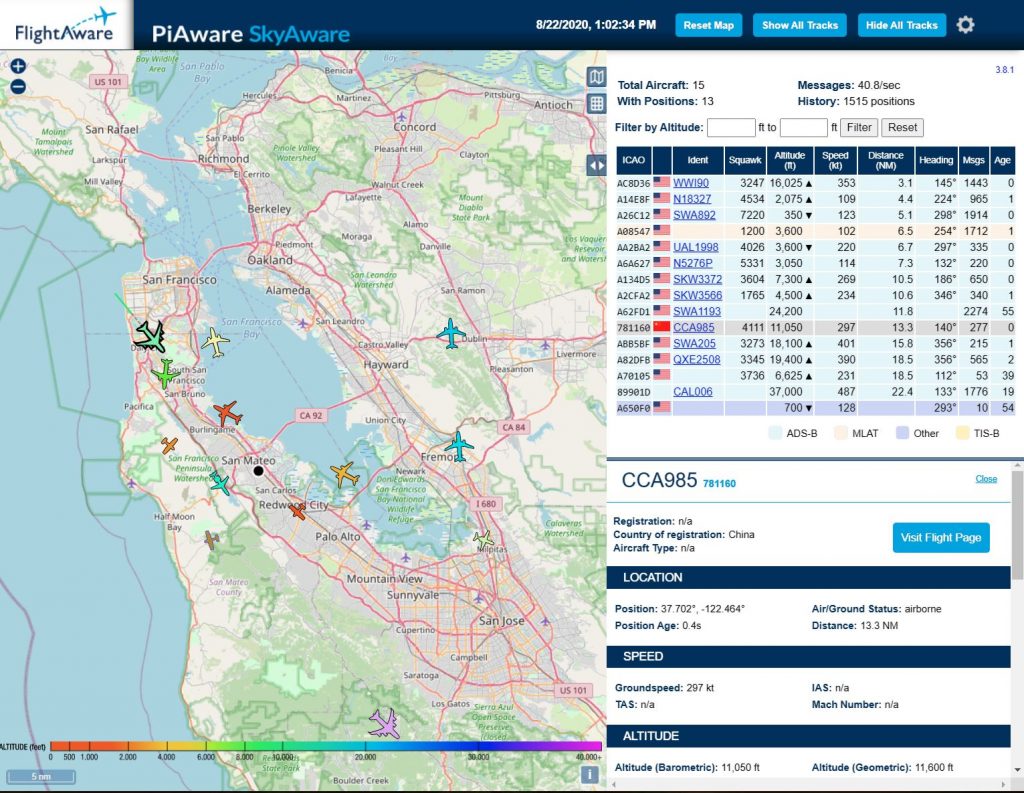
PiAware最大的问题是没办法记录曾经检测过的飞机,于是我又开始折腾起了功能更强大的FlightAirMap。
Install git, mariadb, apache and PHP with needed modules:
sudo apt-get install git mariadb-server apache2 php5 php5-curl php5-mysql php5-gd php-pclzipOr this on Stretch:
sudo apt-get install git mariadb-server apache2 php7.0-common php7.0-cgi php7.0-mysql php7.0-curl php7.0 php7.0-xml php7.0-zip php7.0-gd php7.0-jsonGet FlightAirMap from git:
cd /var/www
sudo git clone --recursive --depth=1 http://github.com/ysurac/flightairmap
Edit Apache conf /etc/apache2/site-available/000-default.conf, add this in VirtualHost section:
<VirtualHost *:8088>
        ServerName 192.168.68.128/flightairmap
        DocumentRoot "/var/www/flightairmap"
        <Directory /var/www/flightairmap>
                Options Indexes FollowSymLinks
                AllowOverride All
                Require all granted
        </Directory>
</VirtualHost>
Enable mod rewrite:
sudo a2enmod rewriteRestart apache2:
sudo service apache2 restartFix permissions:
cd /var/www/flightairmap
sudo chmod 666 require/settings.php
sudo chmod 777 install/tmp
sudo chmod 777 data
Create database and user, may skip if already created:
mysql -u root -p
update mysql.user set password=password('YOUR_DB_PASSWORD') where user='root';
Then:
CREATE DATABASE `flightairmap`;
GRANT ALL ON `flightairmap`.* TO 'youruser'@'localhost' IDENTIFIED BY 'yourpass';
FLUSH PRIVILEGES;
Now use your browser to go to http://127.0.0.1/install/ (or ip of your server) Run scripts/update_db.php in a shell.
cd /var/www/flightairmap/
php scripts/update_db.php
Add FlightAirMap service:
sudo cp /var/www/flightairmap/install/init/flightairmap.service.systemd /etc/systemd/system/flightairmap.serviceAlter paths to match your path, may skip i no change to the installation folder:
sudo nano /etc/systemd/system/flightairmap.service
sudo chmod 644 /etc/systemd/system/flightairmap.service
Then you can run flightairmap daemon:
sudo systemctl enable flightairmap.serviceAdd update_db.php in /etc/crontab:
sudo 5 * * * * root php /var/www/flightairmap/scripts/update_db.php >/dev/null 2>&1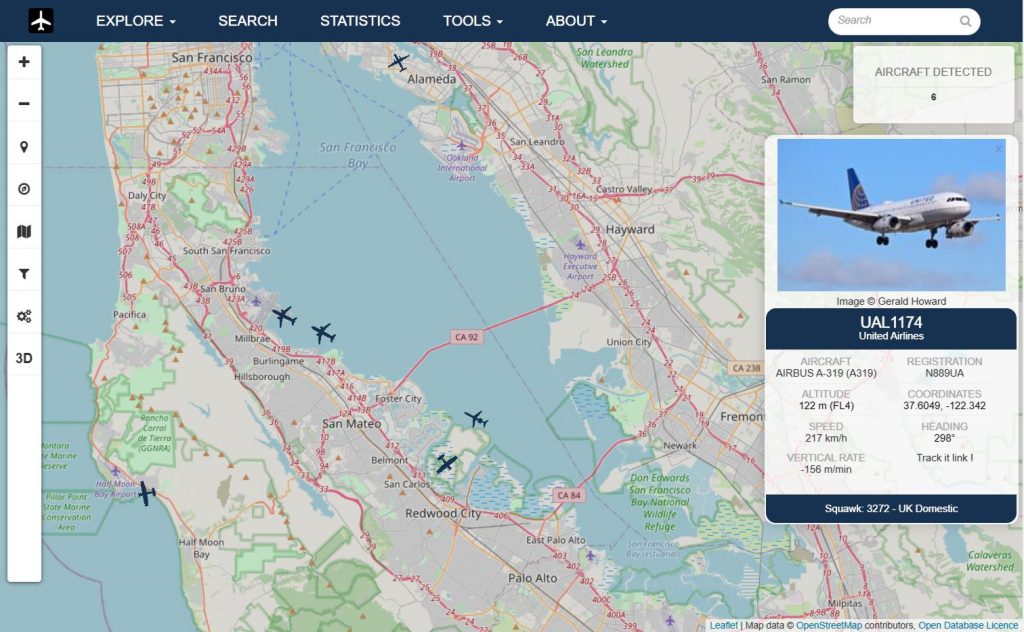
官方解释:
您的地面站可以运行 FlightAware 的 PiAware 软件,用于跟踪在 100-300 miles (视线内,取决于天线的安装范围) 内的飞行,并自动将数据传送给 FlightAware。 您可以直接从您的 PiAware 设备或通过 FlightAware.com 跟踪航班。为了表达FlightAware的谢意,发送ADS-B数据的用户将享受以下优待:
硬件:
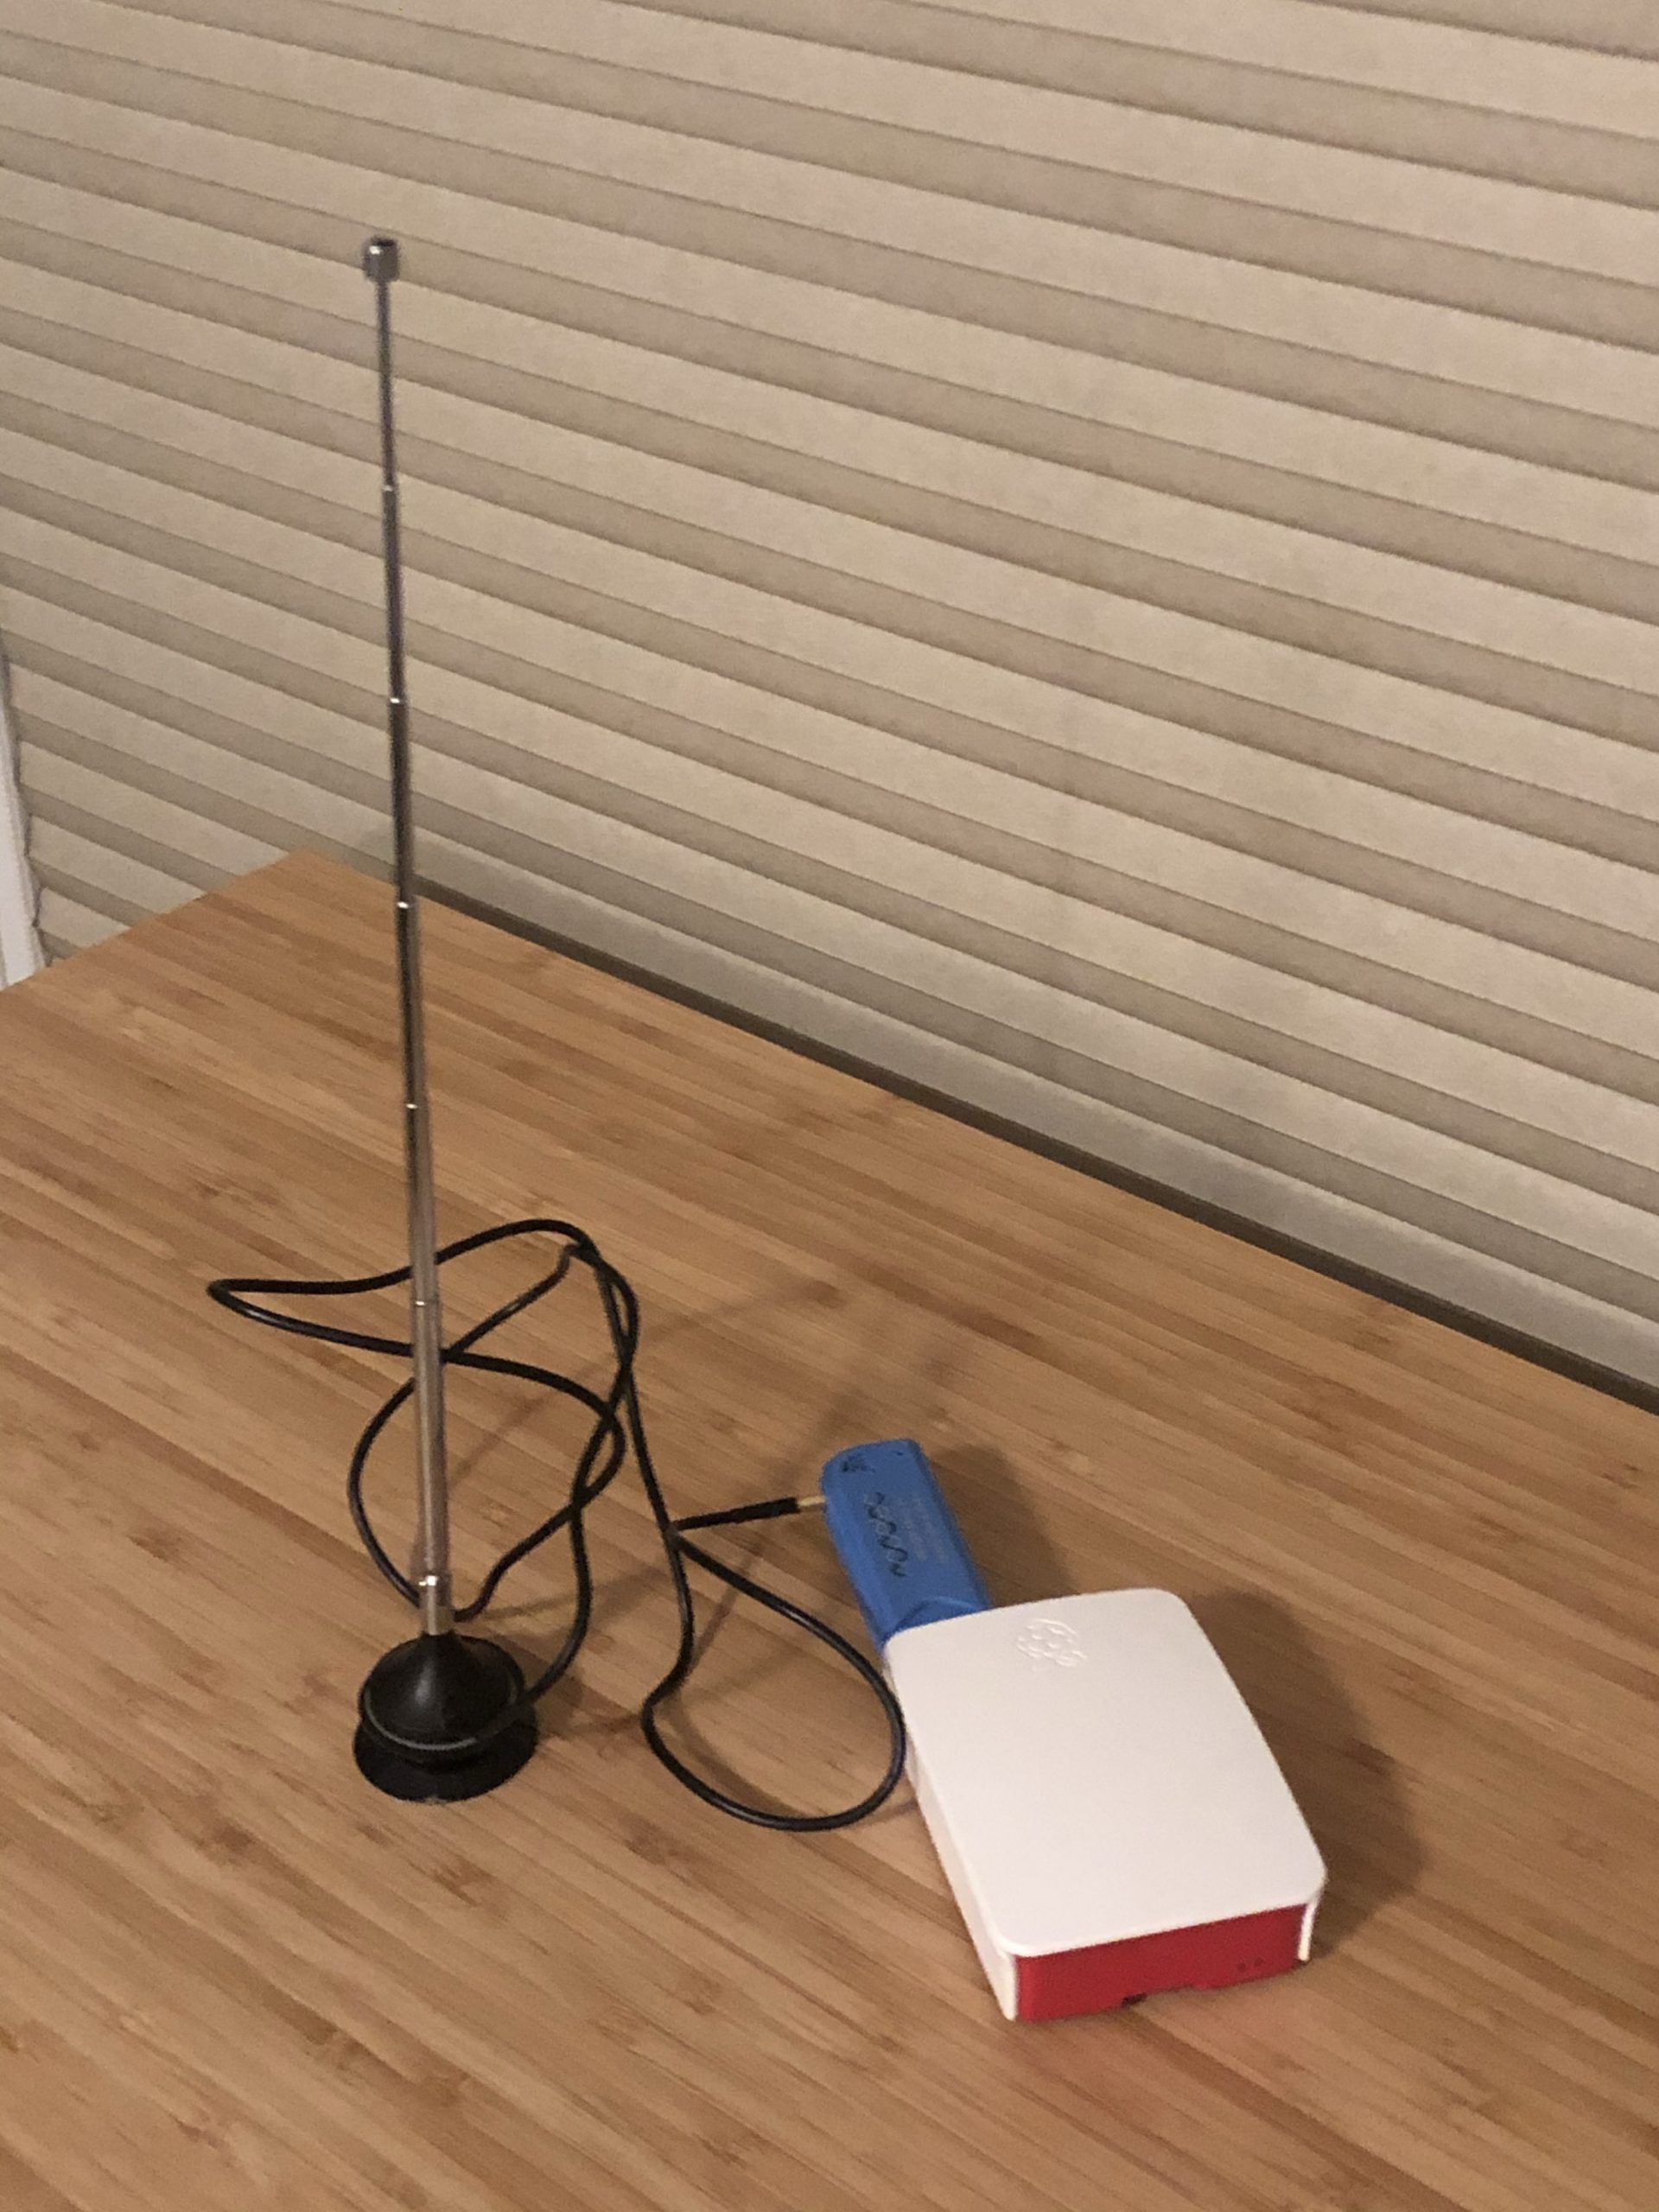
将amazon购买的ADS-B接收器连上天线,并插入RasPi的USB口。
软件:
wget https://flightaware.com/adsb/piaware/files/packages/pool/piaware/p/piaware-support/piaware-repository_3.8.1_all.deb
sudo dpkg -i piaware-repository_3.8.1_all.deb
sudo apt-get update
sudo apt-get install piaware
sudo piaware-config allow-auto-updates yes
sudo piaware-config allow-manual-updates yes
sudo apt-get install dump1090-fa
sudo reboot
安装完毕后,登录flighwaware网站激活刚安装完毕的客户端
https://flightaware.com/adsb/piaware/claim
激活以后,就能在本地局域网看到本地地图以及正在追踪的飞机了。
还有一个问题,由于我这个RasPi,之前已经安装了Apache运行wordpress和piwigo相册,而PiAware默认使用的是lighttpd服务器,两者(Apache和lighttpd)同时运行,会造成端口监听冲突,同时也会加重主机的负荷,所以我又多做了几个步骤,把dump1090-fa的服务迁移到了Apache上。
具体步骤很简答,只需要改动两个文件:
第一个是在/etc/apache2/ports.conf中加入对8080端口的监听 :
Listen 8080
其次,将8080端口的服务加入到/etc/apache2/sites-available/000-default.conf:
<VirtualHost *:8080>
        ServerAdmin webmaster@localhost
       DocumentRoot /usr/share/dump1090-fa/html/
       Alias  "/dump1090-fa/data/" "/run/dump1090-fa/"
       Alias  "/data/" "/run/dump1090-fa/"
       Alias  "/dump1090-fa/" "/usr/share/dump1090-fa/html/"
       Alias  "^/dump1090-fa$" "/dump1090-fa/"
        #SetEnvIf Request_URI "/dump1090-fa/data/.*\.json$" Header set "Access-Control-Allow-Origin" "*"
        <Directory "/usr/share/dump1090-fa/html/">
        Require all granted
        Options All
        AllowOverride All
        SetEnvIf Request_URI "/dump1090-fa/data/.*\.json$" Header set "Access-Control-Allow-Origin" "*"
        </Directory>
        <Directory "/run/dump1090-fa/">
        Require all granted
        Options All
        AllowOverride All
        SetEnvIf Request_URI "/dump1090-fa/data/.*\.json$" Header set "Access-Control-Allow-Origin" "*"
        </Directory>
        ErrorLog ${APACHE_LOG_DIR}/error.log
        CustomLog ${APACHE_LOG_DIR}/access.log combined
</VirtualHost>
重启Apache服务
sudo service apache2 restart
禁用lighttpd
sudo systemctl disable lighttpd
sudo update-rc.d -f lighttpd remove
将Apache服务设为自动启动
sudo systemctl enable --now apache2
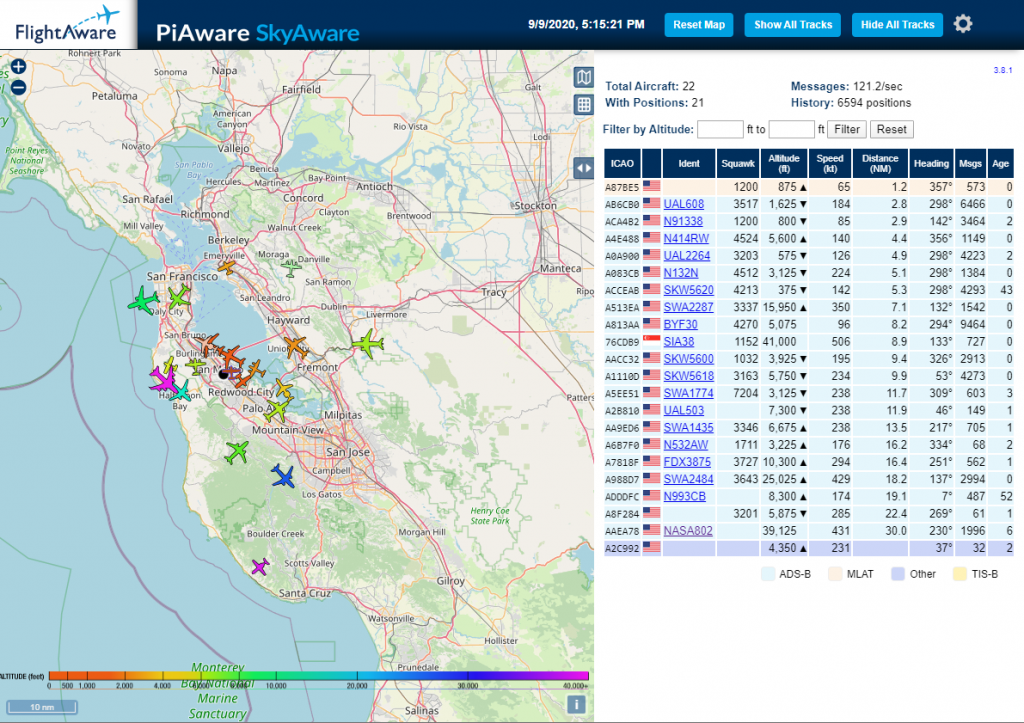
Amazon买的ADS-B自带的天线信号有点弱,只能接收到周围25NM左右的范围,接下来可能另外买一个信号强一点的天线,同时需要调整一下摆放位置。
https://flightaware.com/adsb/piaware/install
https://discussions.flightaware.com/t/migrate-dump1090-fa-to-apache/34053/11
sudo apt-get update
sudo apt-get upgrade
sudo apt install exfat-fuse exfat-utils
sudo apt install apache2 -y
sudo apt-get install mariadb-server -y
sudo apt-get install php php-mysql -y
sudo apt install phpmyadmin
select "apache2" option by pressing SPACE and then ENTER
select "Yes" at the next prompt
Set a password for PHPMyAdmin
sudo mysql -u root -p
GRANT ALL PRIVILEGES ON *.* TO 'username'@'localhost' IDENTIFIED BY 'password_set_in_previous_step' WITH GRANT OPTION;
exit out of MySQL cmd line by typing “quit” in the terminal
sudo nano /etc/apache2/apache2.conf
Add the following line to the bottom of the file:
Include /etc/phpmyadmin/apache.conf
Save and exit by pressint CTRL + X and then pressing Y then ENTER.
sudo service apache2 restart
Type http://localhost/phpmyadmin in browser
User Name and Password are the ones set in previous step.
sudo apt install gedit -y
sudo gedit /etc/php/7.3/apache2/php.ini
update the following values:
memory_limit: 256M (default = 128)
post_max_size: 64M
upload_max_filesize: 40M
Save and exit.
Restart apache
sudo /etc/init.d/apache2 restart
Create new database (match the database name in the backup sql file)
Go to Import tab (ignore errors), select backup sql file and import
Copy from USB drive (files and folders under public_html folder/) to /var/www/html/ folder
Open “wp-config.php” with Text Editor.
Update the following values:
DB_USER
DB_PASSWORD
Also, add the following values:
define(‘WP_SITEURL’, ‘http://www.hi-alex.com/’);
define(‘WP_HOME’, ‘http://www.hi-alex.com/’);
sudo nano +613 /usr/share/phpmyadmin/libraries/sql.lib.php
replace code
((empty($analyzed_sql_results['select_expr']))
    || (count($analyzed_sql_results['select_expr'] == 1)
        && ($analyzed_sql_results['select_expr'][0] == '*')))
with
((empty($analyzed_sql_results['select_expr']))
    || (count($analyzed_sql_results['select_expr']) == 1)
        && ($analyzed_sql_results['select_expr'][0] == '*'))
Ctrl + O
Enter
Ctrl + X
sudo service apache2 restart
sudo nano +613 /usr/share/phpmyadmin/libraries/sql.lib.php
replace code
if ($options != null && count($options) > 0) {
with
if ($options != null && count((array)$options) > 0) {Ctrl + O
Enter
Ctrl + X
sudo service apache2 restart
Open it in a text editor (sudo nano /etc/phpmyadmin/apache.conf) and find the block that looks like:
<Directory /usr/share/phpmyadmin>
...
</Directory>
Inside the block, add the following lines:
Order Deny,Allow
Deny from all
Allow from localhost
Allow from 127.0.0.1
Allow from 192.168.68.0/24
Ctrl + O
Enter
Ctrl + X
sudo service apache2 restart
sudo nano /etc/apache2/sites-enabled/000-default.conf
Add the following lines:
ServerAdmin webmaster@localhost
DocumentRoot /var/www/html/blog
ServerName www.hi-alex.com
Ctrl + O
Enter
Ctrl + X
How to Install WordPress on Raspberry Pi
How to Install phpmyadmin on Raspberry Pi
Increase phpmyadmin import file size
Mount ExFat disk on Raspberry Pi
Copy or Move WordPress to Another Server
Fix phpmyadmin error
Fix phpmyadmin error on Import tab
朋友介绍说Nokia Sports Tracker这个软件不错,只要给手机配一个GPS接收器,就能把出行的路线全部记录下来。。。
今天骑着新车,带着GPS和手机,出去逛了一圈,感觉好不错,基本上路线比较准确,只是有时候信号会漂移的比较厉害,不知道是什么道理。
另外,软件有一个比较简单的图表功能,可以显示不同阶段的速度等等信息,总之比较好玩。
因为是同NOKIA手机整合的软件,所以可以利用GPRS将记录的数据直接上传到NOKIA的官方网站,在那里可以将数据和Google Earth的地图结合起来,就能看到非常完整的行走路线咯~~
时间:2月21日 – 2月22日
天气预报:戳
酒店:
如家快捷酒店(南京新街口店) (已预定)
地址:南京 白下区 明瓦廊133号
电话:025-84213808
火车票:
往:D406(07:50 – 10:15)
返:D447 (19:00 – 21:20)
行程:
D1
07:50 D406次动车,上海站出发
10:15 左右到达南京站
10:30 玄武湖
11:30 旅馆check-in (新街口)
12:00 午餐 (王子牛蛙(新街口石鼓路店) 白下区石鼓路226号 )
13:00 中山陵/明孝陵
17:30 夫子庙
19:00 晚餐 (鼓楼区湖南路狮子桥:南京大牌档、尹氏鸡汁汤包、回味鸭血粉丝汤、京城葫芦王)
21:00 泡吧 (酒吧1912街区 全是酒吧)
D2
08:00 起床吃早饭Check-out
10:00 总统府
12:30 午饭 (金汉斯南美烤肉)
14:00 南京大屠杀遇难同胞纪念馆
18:30 火车站
攻略:
小吃+酒吧(下载)
景点信息(下载)

居然出现了奴隶数 -1。。。
而且马奴隶viao草票了。。。苦些无一塔瓜子则有六千多洋地。。。基本郎撒拧啊马伐起。。。
5只白白嫩嫩的鸡翅,正静静地躺在冰箱里享受着蜜汁的腌制
明天晚上,就能正式进入烤箱烘培了~~~